Urad Dal Rice | Ulundhanchoru | Rice Recipe | Ulundhu Sadham | Ulundhu Choru |

Perfectly cooked Rice flavored with urad dal and Fenugreek. Enjoy these aromatic Ulundhanchoru (Urad dal Rice) with mutton curry or any curry or lentil.

This particular recipe is a popular South Indian dish from Tirunelveli where Black Lentil (Urad Dal) is combined with rice to make a hearty dish.

Minimally spiced, easy to put together with few ingredients, its a complete protein meal. The simplicity of this dish makes this a winner in my eyes.

My mom would always make Ulundhanchoru for a non-veg treat at home, so I always prefer this rice over plain rice on such days. So this recipe has been in my repertoire and makes for a great lunch box option along with non-veg curries or just as it is, along with a vegetarian side dish.

While you can use Whole Urad Dal, split or skinned for this recipe – I would recommend using whole black lentil for absorption of the nutrients & the taste. As I haven’t been able to get whole black urad dal here in Japan, I’ve made it with skinned ones. But I highly recommend trying it out with whole ones. Oh..and add a sprig of curry leaves while sautéing this Rice and you will love the aroma of it.

Ulundhanchoru is so much more flavorful. Goes well with any side dish, but eating it with Mutton Curry gives an optimal boost. The vegetarians serve it with Ellu Thuvaiyal (Sesame Chutney) which is also an adorable combination. Here are some of the other recipes which pairs well with this rice,

Kerala Chicken Curry

Pepper Chicken

Squid Curry / Kanava Kuzhambu

Chettinad Egg Curry

Prawns Masala

Perfect for all those times when you are lack on time. Or when you just want to make nutritious. Or even when you want to make something special. It fits all the needs. And that’s what simplicity of this dish is all about 🙂 🙂 I know it sounds too much but trust me, this whole thing would take you just 20 minutes to put together.

Let’s start making these yummilicious Ulundhanchoru…


Ingredients

  • 1 cup, Rice (any variety)
  • 3/4 cup, Urad Dal
  • 1 tsp Mustard Seeds
  • 1 tbsp Fenugreek Seeds
  • A sprig of Curry leaves
  • Salt
  • 3 1/2 cups, Coconut Milk (Thin)
  • 1 tbsp, Coconut Oil

Cooking Instructions

  1. Rinse rice and dal together and set aside.
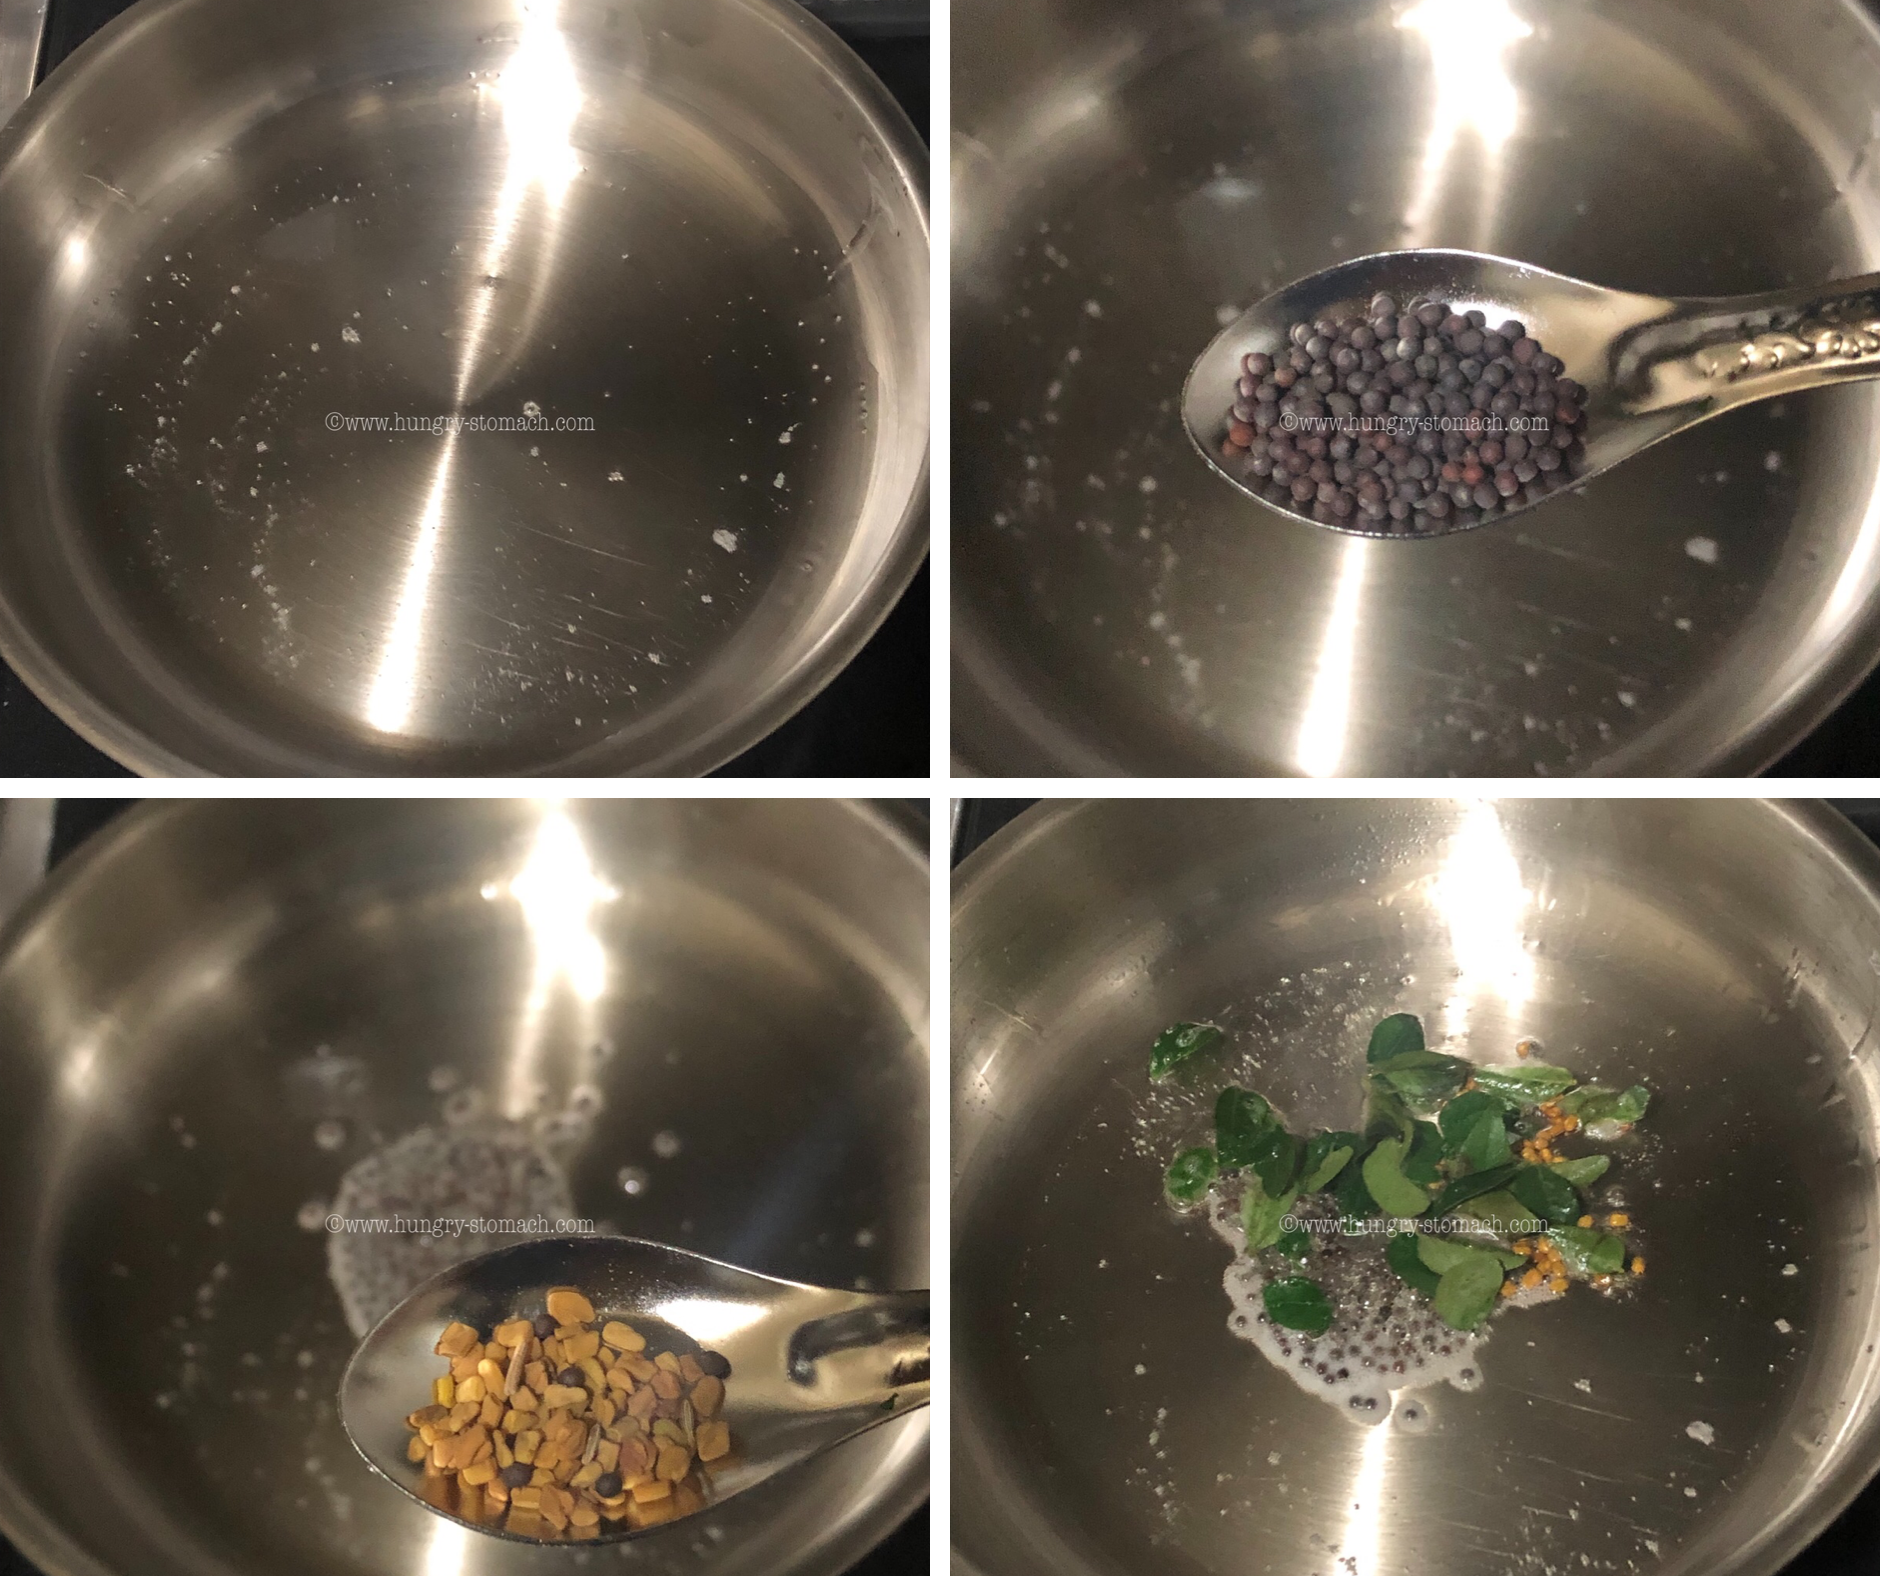
  2. In a pan or pressure cooker, add a tbsp of coconut oil. When hot, temper with mustard, fenugreek and curry leaves.
  3. Add the rice and dal mixture and fry until nice aroma wafts, almost a minute.
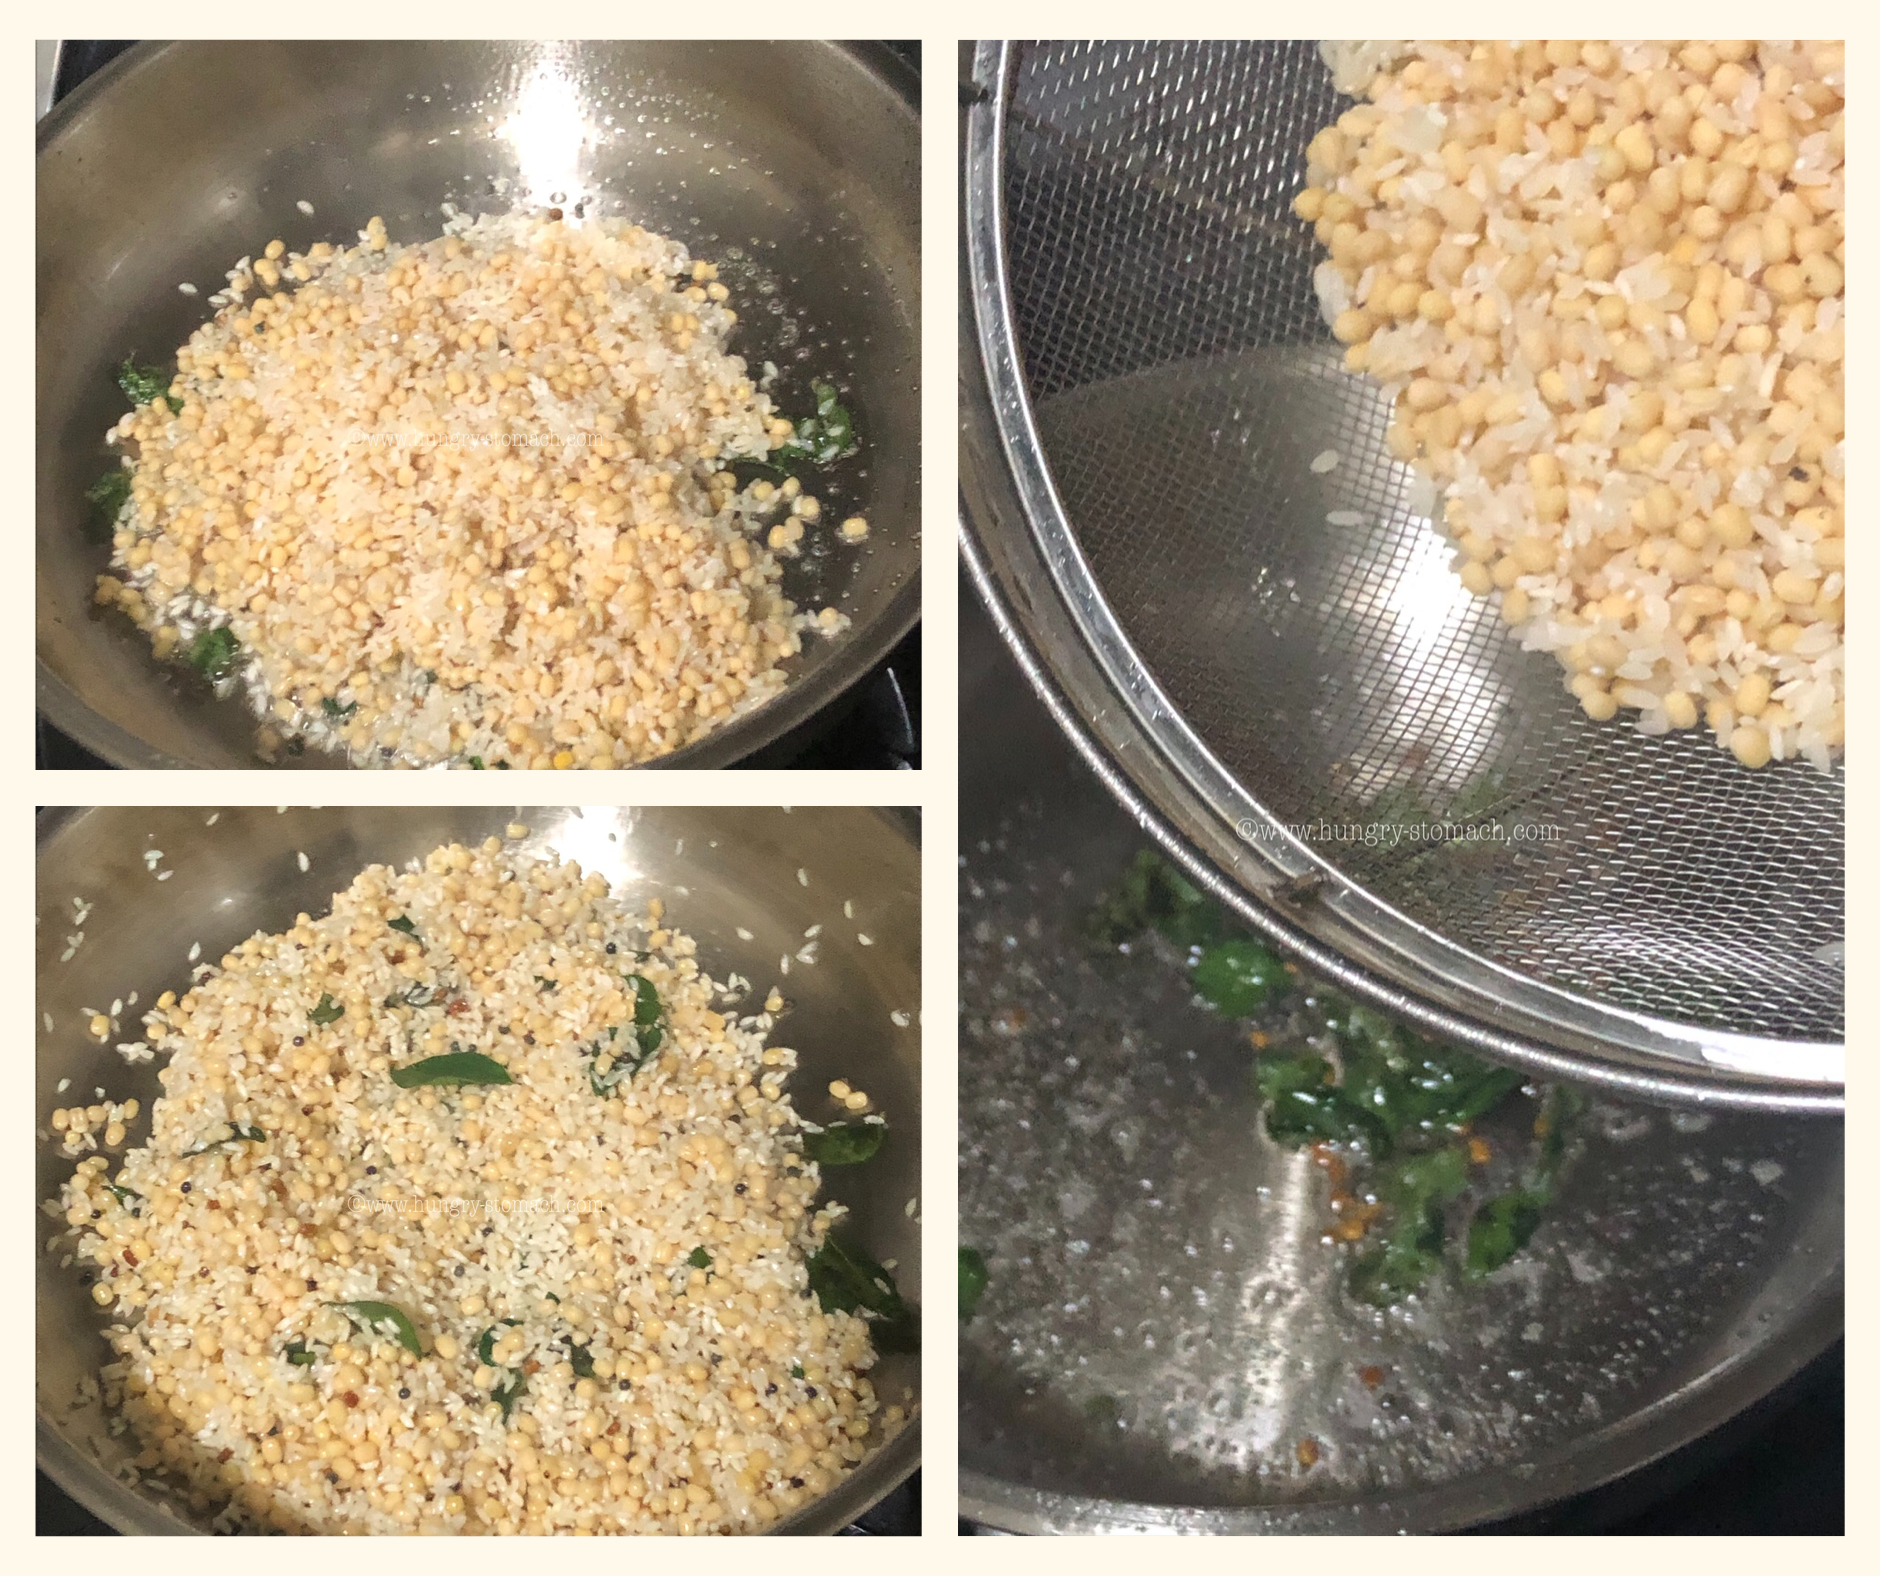
  4. Season with Salt. Add in 3 1/2 cups of thin coconut milk (1:2 ratio), you may add more if you like a mushier rice.
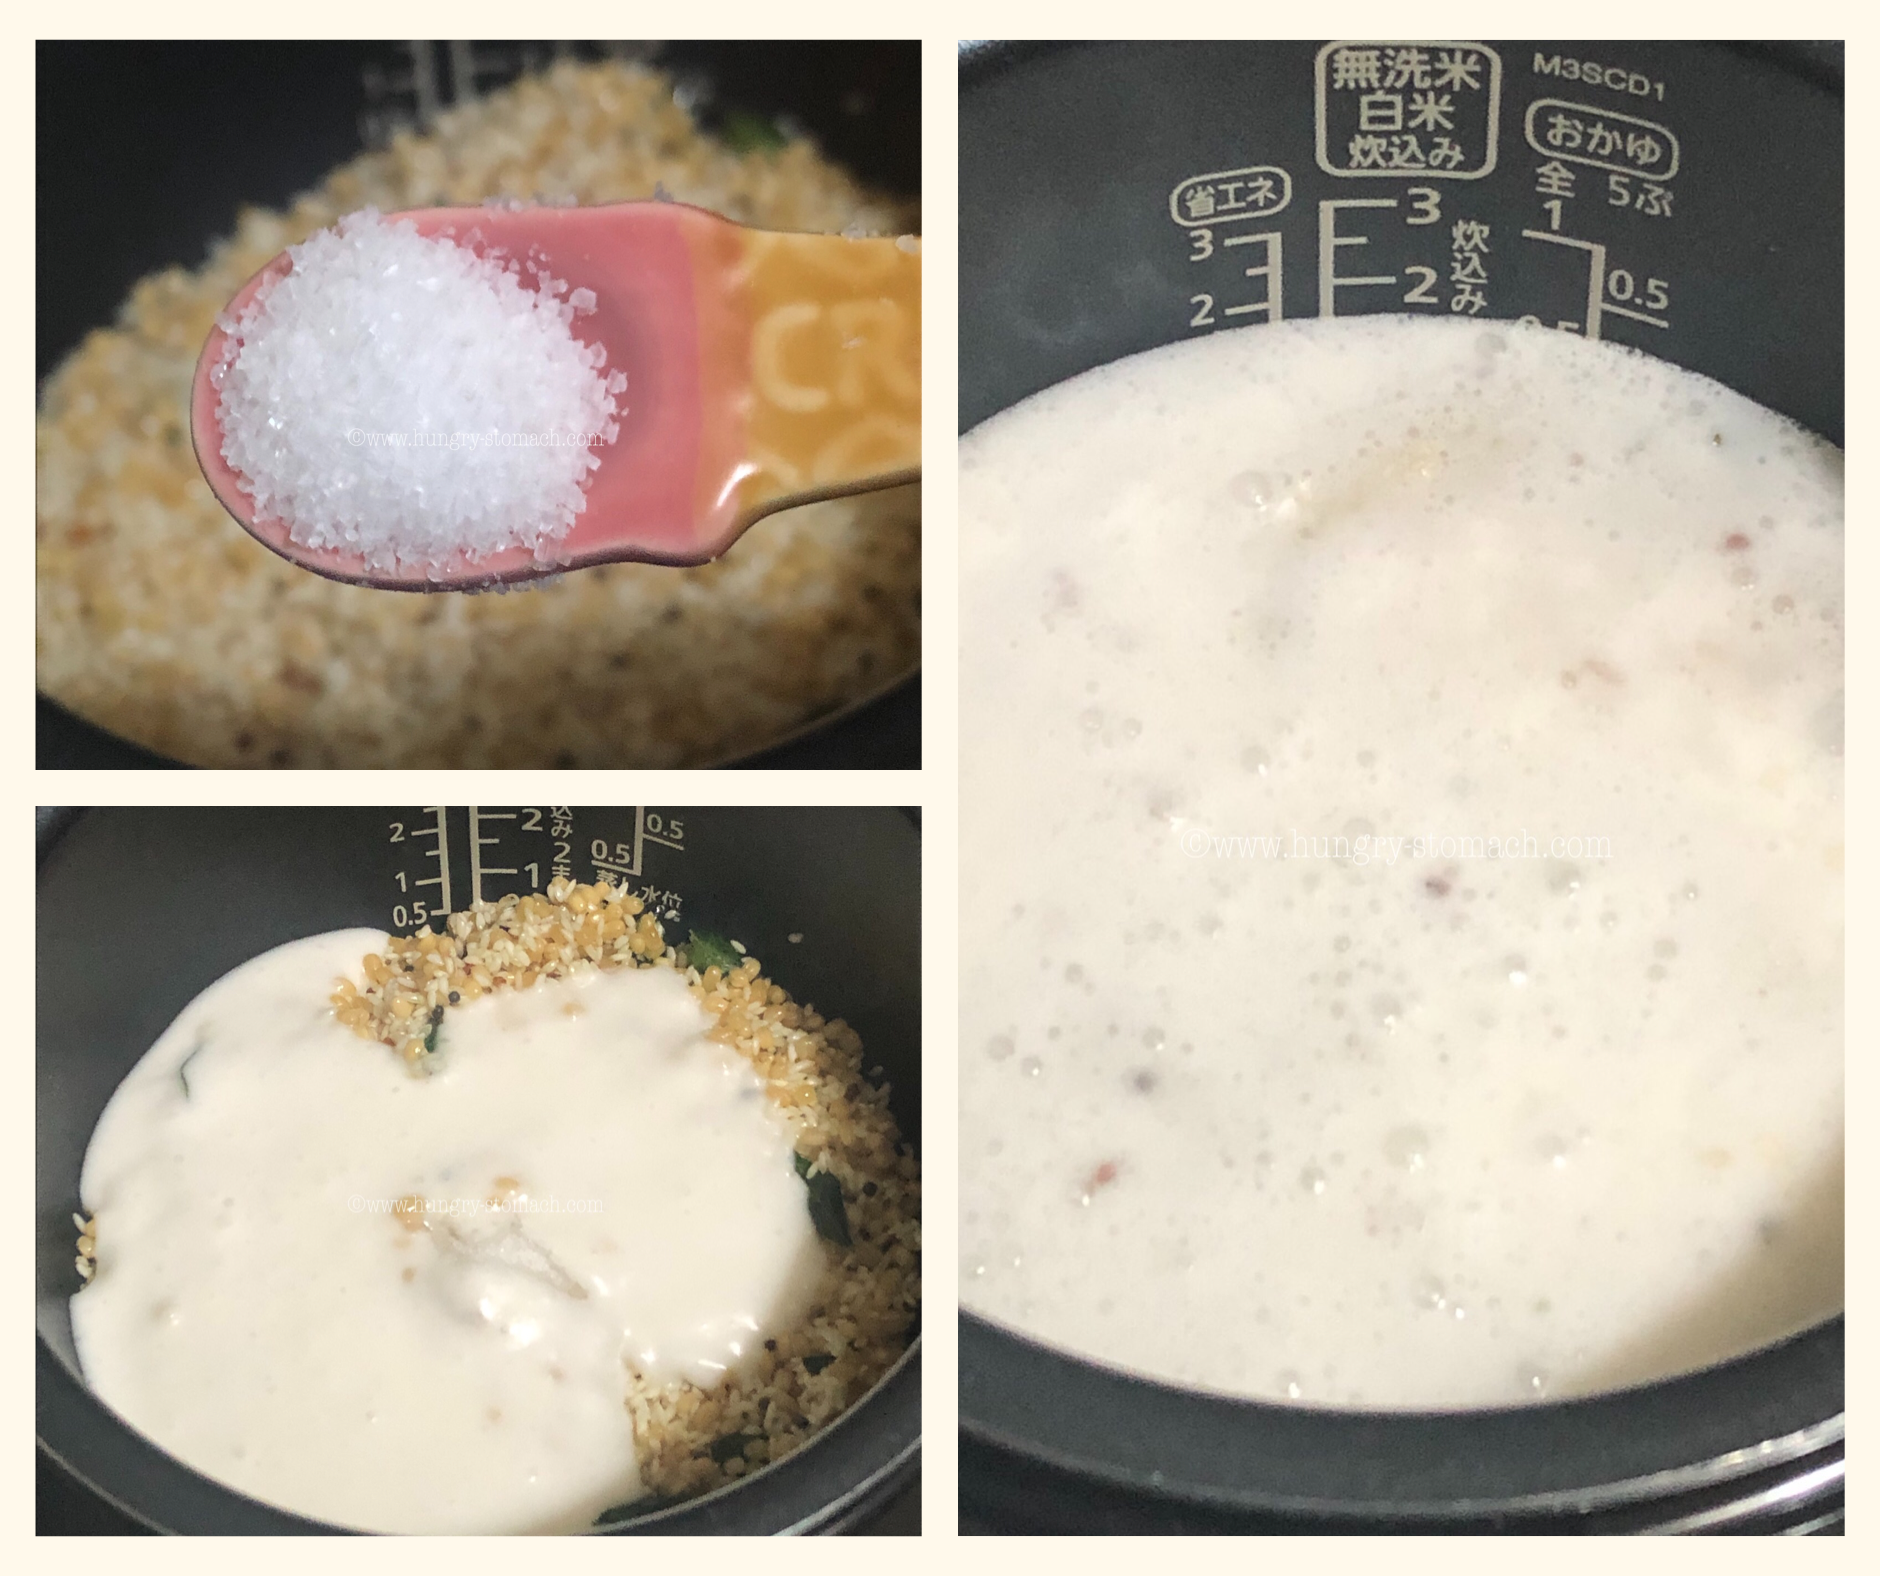
  5. Pressure cook for two whistles. (I’ve used an electric rice cooker today).
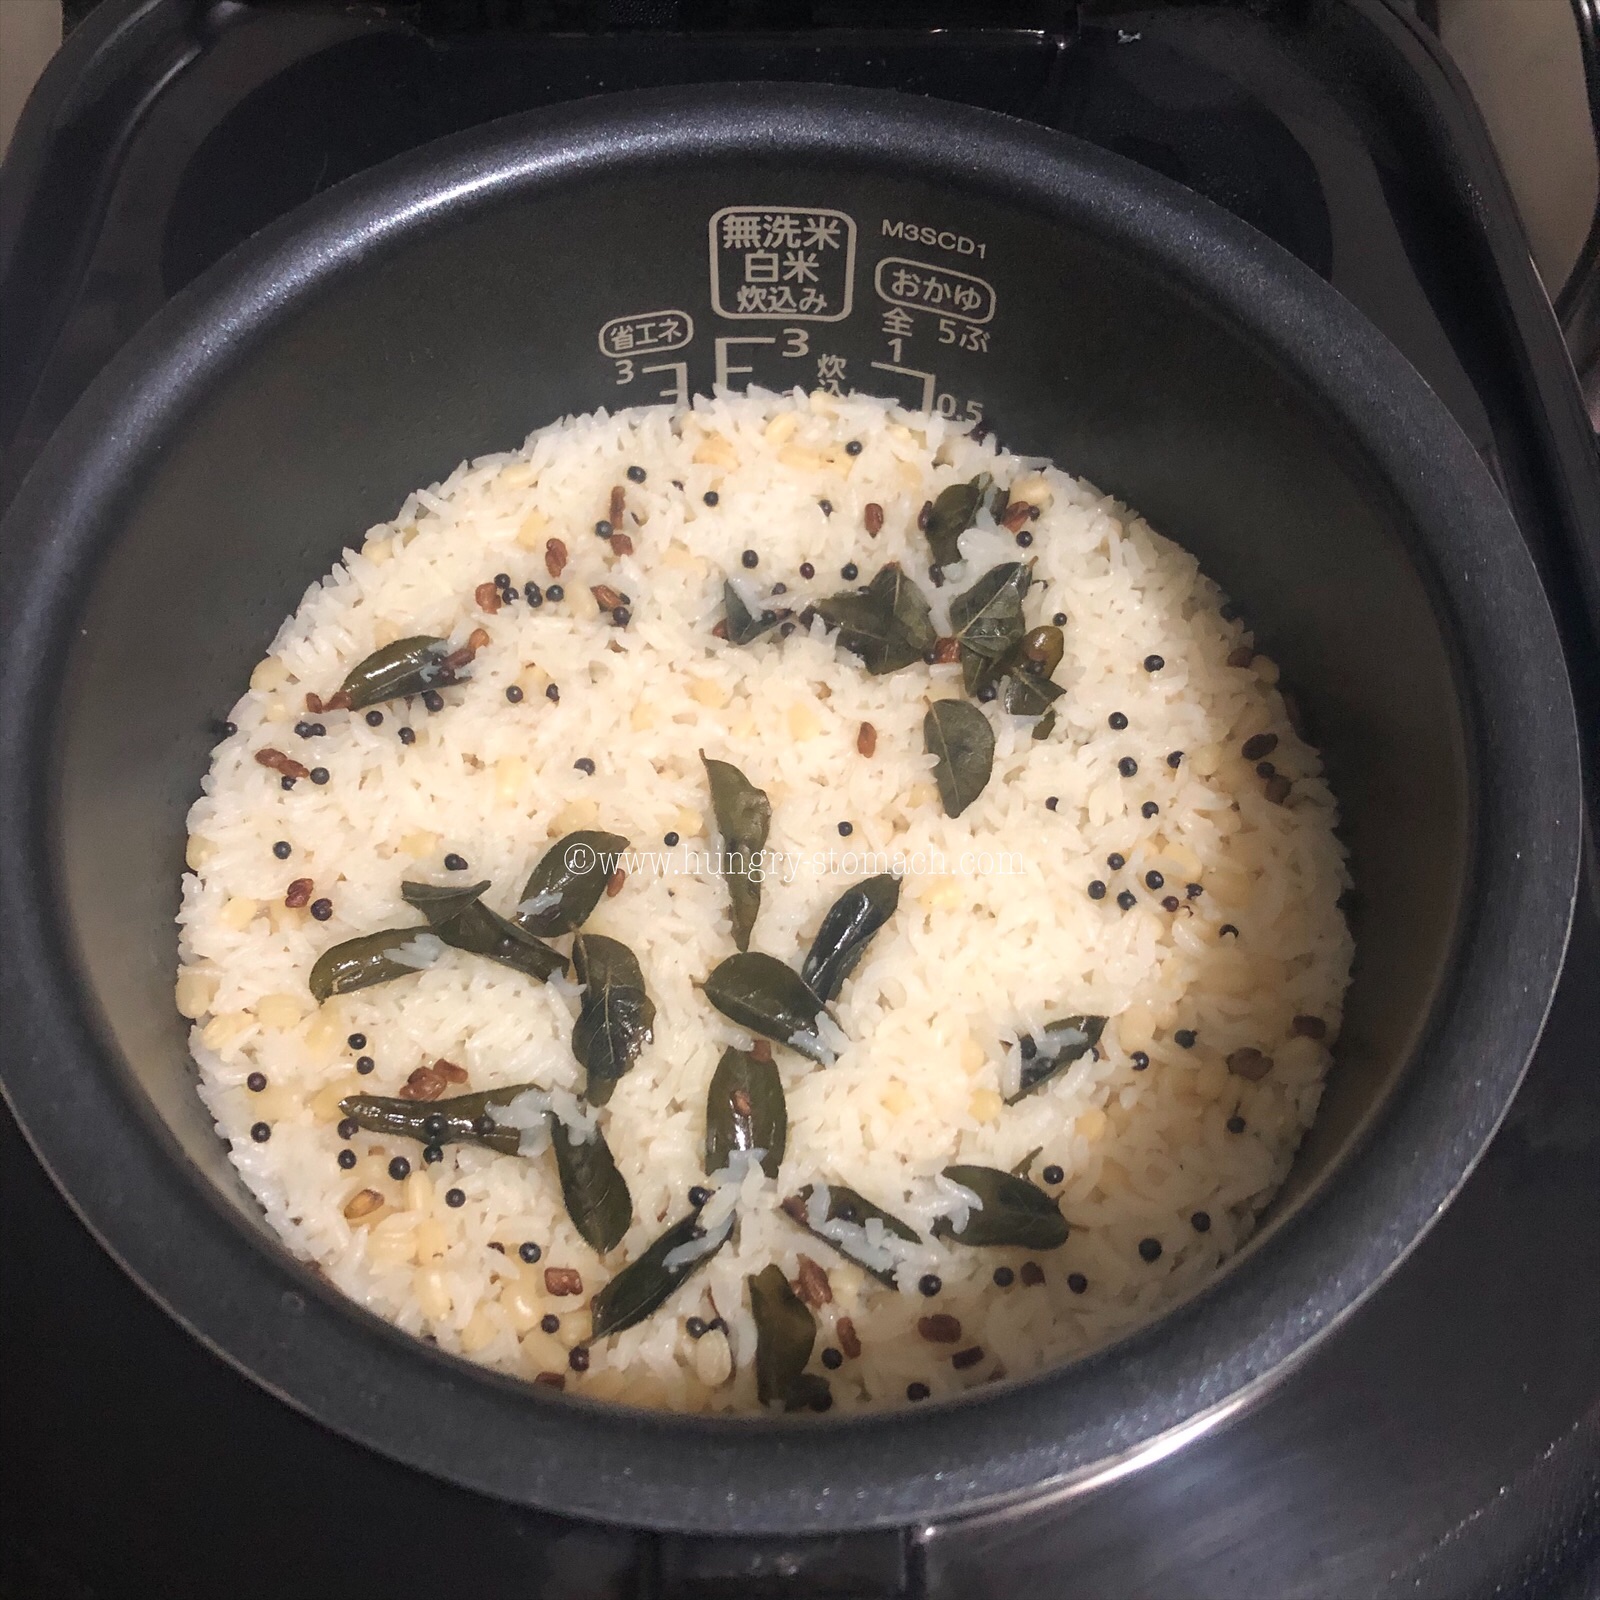
  6. Once done, serve hot with curry of your choice.


Special Notes:

  • Coconut oil gives a nice flavour to the curry. If you’re not comfortable with the flavour, feel free to use any vegetable oil.
  • Coconut milk makes the rice richer. Can be cooked with water alone.
  • Seasoning with fenugreek and curry leaves elevates the taste. But add in moderation as it turns bitter when sautéed until brown.


If you like this recipe, Do not forget to leave a comment at the end of the post.

Did you make this recipe? If yes, do let me know how it turned out in the comments below. Do share a picture on instagram with hashtag #CookedFromHungrystomach and tag us @hungry.stomach.japan

Ragi Idli Recipe (Finger Millet Idli) / Ragi Dosa / Millet Idli / ராகி இட்லி

I am fascinated with millets recently due to its health benefits. Millets are one of the ignored super foods, probably due to its taste or texture or the preparation process. I have shortlisted this age old diet and have been experimenting with a lot of millets like Foxtail Millet (thinai/ தினை) , Barnyard millet (kuthiraivali/ குதிரைவாலி), Kodo millet (varagu/ வரகு) and Little Millet (saamai/ சாமை) for the last few months.

These millets are extensively cultivated and consumed by the rural folks because of its nutritional value and affordability.

In South India, Ragi Koozhu or Kanji were the prominent baby foods until the fake health drinks enter the market.

Having received great response for my Multi-Millet Dosa Recipe, I was asked by husband to try some varieties of Idli/ Dosa that are healthy, tasty and nutritious too.

Ragi Idli’s got my attention when I saw it on Skinny Recipes by Nisha Homey’s Instapage. Also, I do love the earthy color of ragi idlies. I did a bit of modification with the measurements to the original recipe.

What is Ragi?

Finger Millet (ragi/ ராகி) is quite rich in nutrients. This is now consumed world wide due to its health benefits across all age groups. They are Gluten Free, Rich in Calcium, Protein rich & Control Diabetes.

Since I made Ragi Idli from scratch, I thought of documenting each step with a lot of notes. A few pointers before I proceed to the recipe.

This Ragi Idli Recipe is not the instant version nor uses Ragi Flour. This is made with whole Ragi seeds alone and Rice is not been used. Ragi seeds are soaked, ground along with Urad Dal & fermented. You can use any millet available to prepare this healthy dish.

This is a multipurpose batter. You can use this batter to make Dosa too by adjusting the consistency with water. I usually make idlis for myself and then switch over to dosa for my husband.

These Ragi Idlis are fluffy, soft and spongy. Can be eaten for breakfast or dinner with a vegetable loaded Sambar or Chutney. You can also toss them with a tempering like Gun powder aka Molaga Podi/ Chutney Powder for an additional twist.

I was asked by few readers to post the fermentation tips too. I hope you’ll find this recipe useful, the next time you make Batter from any Millets.


Ingredients

  • 2 cups, Ragi
  • 1/2 cup, Urad dal
  • 1/2 tsp Fenugreek Seeds
  • 1 tbsp, Cooked Rice (If using Mixer Grinder)
  • Rock salt

Instructions

  1. Rinse the Ragi, Urad Dal & Fenugreek seeds until the water turns clear. Soak everything together. Soaking time should be atleast 6-8 hours. Overnight soaking is also recommended if using a mixer grinder.

2. After soaking, drain the water & Grind everything with little water into a thick and fluffy batter. (If grinding in a mixie, add a tbsp of cooked rice and grind along).

3. Add salt & Mix with hands gently (clockwise and anti-clockwise) for atleast 5 minutes. This aids in fermentation.

4. Keep the batter aside for fermentation by covering with a plate. The fermentation time usually depends on the climate conditions.

5. Once the batter is fermented, mix lightly.

How to make Idli:

  1. Grease the idli plates with oil. Meanwhile, prepare the steamer by heating some water.
  2. Carefully pour the idli batter on to the plates and steam them for 15 minutes.
  3. Switch off & Allow it to rest for 5 – 10 minutes.
  4. Remove the Idli Plates and once they cool slightly, demould them with a wet spoon.
  5. Serve with Chutney or Sambar.

What if Idly Batter is too watery? Make Dosa!!!

  • If you accidentally add more water to the ragi mixture, you can make Uttapam, Paniyaram / Appe which serve as excellent after school snacks too.
  • If you still feel the batter is watery, add 1/2 cup of soaked and ground aval / poha / flattened rice to the batter.

Tips on Fermentation:

If you are in India, fermentation is generally not an issue. For people staying in colder countries, place the batter in

  • Instant pot (With the settings to ferment).
  • In an oven with light on.
  • In a clean pressure cooker with no water inside.

Additional Notes:

  • If your batter has still not fermented after 10 to 12 hours, add 1/4 tsp of Baking Soda or ENO (fruit salt) just before steaming.
  • Always pour little quantity of batter, allow it to naturally spread. Excess batter expand or rise while steaming turning idlis crack at top or harder.
  • Pour the batter only when the steamer is completely ready.
  • Do not open the steamer immediately. Allow it to rest for few minutes.
  • Mixing the ground batter gently with hands for 5 minutes, aids in good fermentation. Never skip this step.

Vazhaipoo Rasam | Banana Blossom Rasam | Rasam without Dal | Simple Rasam Recipe

Rasam is an authentic south Indian Recipe. Rasam, the most delicious appetizer drink is light on stomach and high on taste. This flavourful dish is ideally served before after the main course.

Rasam doesn’t appear in my daily kitchen menu. But recently I am addicted to different kind of rasams. One such is the Vazhaipoo / Banana Blossom Rasam.

Vazhaipoo is something which we rarely buy at home. It is just the prep work needed for the flower which stops me from buying it frequently.

Similar to Tomato Rasam, preparing Vazhaipoo Rasam at home is very easy and it requires basic ingredients like tomato, tamarind, black peppercorns, garlic and cumin seeds.

On a side note, vazhaipoo is extremely healthy with immense benefits. And at the end, I always feel that the time and effort I had put in was not in vain.

So, try this simple recipe at home with your own choice of flavors and relish with your loved ones.


Author: Nathiya Adiseshan
Preparation Time: 3 mins
Cooking Time: 10 mins
Serves: 3

Ingredients:

For the Rasam:
  • 2 medium Tomatoes, Pureed
  • 1/2 Tomato, chopped into quarters
  • 20-25 florets, Vazhaipoo, finely chopped
  • Tamarind, gooseberry sized
  • 1/4 tsp, Turmeric powder
  • a pinch, Asafoetida
  • a sprig, Curry leaves
  • a bunch, Coriander leaves
  • Salt
  • 2 pods, Garlic crushed
For Rasam Powder (Dry roast and grind):
  • 1/8 tsp, Fenugreek seeds (optional)
  • 1 tsp, Cumin seeds
  • 1 tsp, Pepper
  • 1 tsp, Coriander seeds
  • 1 tbsp, Toor dal
  • 1, Red chilli
  • Curry leaves
To temper:
  • 1/2 tbsp, Oil
  • 1/4 tsp, Mustard seeds
  • 1/4 tsp, Cumin seeds
  • a sprig, Curry leaves
HOW TO MAKE RASAM
  1. Puree tomatoes along with gooseberry sized tamarind.
  2. In a kalchatti, add the tomato puree, chopped tomatoes, turmeric powder, crushed garlic, curry leaves, chopped vazhaipoo/ banana blossom, asafoetida and salt.
  3. Pour 3 cups of water & bring it to a boil. Then simmer for 5 mins or until raw smell of tamarind goes away.
  4. Add in a tbsp of rasam powder. Allow it to boil.
  5. Taste the rasam and add more salt as needed to suit your taste. Simmer it for 2-3 mins.
  1. Meanwhile heat oil in a tadka pan and temper with the ingredients listed above. Fry this mix until it starts crackling and pour it over the rasam. Garnish with coriander leaves.
  1. Turn off the stove. Keep the pot covered for 15 minutes before serving.
  2. Serve rasam with rice or just serve it as an appetizer in your meal.


Special Note:

  • As soon as it becomes frothy, turn off the stove. Cover it for 15 minutes before serving, the resting time at the end also plays a major role in flavor.
  • Adjust the quantity of rasam powder to satisfy your taste buds.
  • Store bought rasam powder can also he used. But check on the turmeric powder and asafoetida content while adding.